just me

Posts Tagged ‘Chicken’

Chicken Teriyaki

In Chicken on June 2, 2010 at 5:47 pm

A simple solution to Asian cravings.

Omigod don’t lick the screen! It’s just pixels. I know, you can taste it from there.

I’m a HUGE fan of all kinds of Asian food, but takeout can get expensive. Especially when you crave it at least four times a week. A few nights ago, I got one of those salty-sticky-sweet cravings that only a good teriyaki can satisfy, but it was way too late in the evening to place an order.

Left to my own lazy devices, I came up with the simplest thing ever, that yields the best, tenderest result. Nothing ruins a good teriyaki like dry chicken and no juice, and this method solves both problems – follow me:

Lay 8 chicken tenderloins on a solid cutting board and pound to about 1/4 inch thickness.

Dump them into a Ziploc bag and add about 1/3 of a bottle of teriyaki baste and glaze. This stuff rocks. It does it all. Regular teriyaki sauce won’t give you that thick stickiness you’re looking for.

Let them marinate for at least a half hour, but as long as you can. While that’s happening, soak 8 bamboo skewers in a tub of water.

When you start getting hungry, preheat the oven to 350, and line a rimmed baking sheet with foil.

Thread each tenderloin onto a skewer so that it’s secure, and lay the skewers on the baking sheet, balancing the ends on the rims. If you’ve threaded appropriately, the chicken itself should not be resting on the baking sheet.

Pop those suckers in the oven, and start the rice.

Cook the chicken for about 25 minutes or until cooked through, basting with the teriyaki glaze and turning as often as you have patience for.

The chicken and the rice should be done about the same time, so put one on top of the other. Doesn’t matter which. You’ll probably have a good bit of glaze drippings in the pan, so drizzle it over the rice, and serve a small dish of teriyaki glaze for dipping.

Mmmmmm….

Stacked Green Chile and Chicken Enchiladas for the Daring Cooks!

In Chicken, Daring Cooks, Vegetables on May 17, 2010 at 12:00 pm
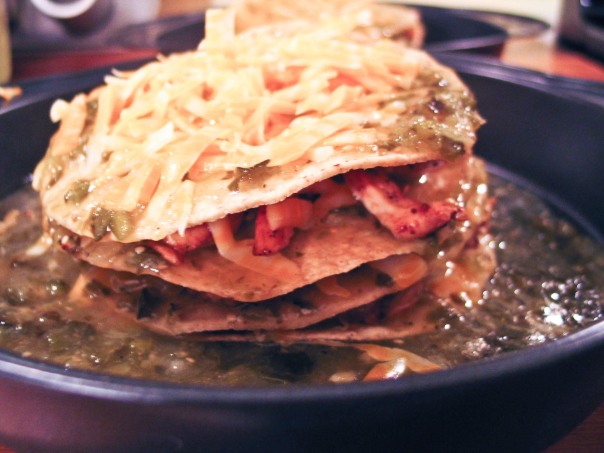
stacked chicken enchilada

Okay, so it's not pretty. But you only see it until it goes in your belly. Which is quickly.

Oh my good were these good!!!!! I love Mexican food, first of all, but really, anything layered with melted cheese is heaven on a plate, am I right? Yes, I am. The sauce is to die for, and has a lovely smoky flavor that makes it a great dip for tortilla chips.

I used Poblano peppers because my stupid grocery store was out of Anaheims the very day I needed them, but it was still really good, and the heat was not a problem. I substituted Colby Jack cheese simply out of personal preference, and to be honest, I probably used a ton more than was necessary. I like cheese.

Don’t get freaked out by the length of the recipe – you can always buy tostada shells pre-fried, and the rest of it doesn’t take much time at all, especially if you use leftover chicken. In fact, It’s a great way to use up extra chicken! You only need a little, and it feeds a bunch of people!

A word of advice – try to bake the enchiladas in individual serving pans if at all possible, because they are very difficult to transfer once they are done. I did mine in cake pans, and just brought those to the table. We don’t put on airs around here.

Okay, kids – go to it!

Blog-checking lines: Our hosts this month, Barbara of Barbara Bakes and Bunnee of Anna+Food have chosen a delicious Stacked Green Chile & Grilled Chicken Enchilada recipe in celebration of Cinco de Mayo! The recipe, featuring a homemade enchilada sauce was found on www.finecooking.com and written by Robb Walsh.

Notes:

1. Roasting the Anaheim chiles is a critical part of the Green Chile sauce. More information about how to do this is included below, but please resist the temptation to rinse the chiles to remove the skin or seeds. You will lose lots of flavor if you do this!!
2. If using a broiler to roast the chiles, lining the broiler pan or baking sheet with foil greatly simplifies the clean-up process!
3. You may want to consider using gloves when peeling and removing seeds from the chiles. I keep a set of gloves in the kitchen for just that purpose. All it takes is one hand to the eye or nose for a lot of pain to set in!

Ingredients

1½ pounds Fresh Anaheim chiles (about eight 6 to 8 inch chiles) 24 ounces 678 grams – roast, peel, remove seeds, chop coarsely. Other green chiles (NOT bell peppers) could probably be substituted but be conscious of heat and size!)
7-8 ounces Tomatillos (about 4-5 medium)212 grams – peel, remove stems
4 cups Chicken broth (32 ounces/920 grams)
1 clove Garlic, minced
2 teaspoons yellow onion, minced
1 teaspoon dried oregano
½ tsp Kosher salt (add more to taste)
¼ tsp Black Pepper (add more to taste)
2 tablespoons Cornstarch (dissolve in 2 tablespoons water, for thickening)
Hot sauce, your favorite, optional
2 Boneless chicken breasts (you can also use bone-in chicken breasts or thighs)
3 tablespoons Olive oil or other neutral vegetable oil (use more as needed)
Kosher salt and pepper
12 Small Corn tortillas (5-6 inch/13-15 cm). (you can also use wheat tortillas or other wraps)
6 ounces grated Monterey Jack, 170 grams (other cheeses (cheddar, pepper jack, Mexican cheeses) can be used. Just be sure they melt well and complement the filling)
Cilantro for garnish, chopped and sprinkled optional

Directions:

Roasting Fresh Chiles

1. Coat each chile with a little vegetable oil. If you are doing only a couple chiles, using the gas stove works. For larger batches (as in this recipe), grilling or broiling is faster.
2. Lay the oiled chiles on the grill or baking sheet (line pan with foil for simpler clean-up). Place the grill or broil close to the element, turning the chiles so they char evenly. They should be black and blistered.
3. As they are completely charred (they will probably not all be done at once), remove them to a bowl and cover with plastic, or close up in a paper bag. Let them rest until they are cool.
4. Pull on the stem and the seed core MAY pop out (it rarely does for me). Open the chile and remove the seeds. Turn the chile skin side up and with a paring knife, scrape away the skin. Sometimes it just pulls right off, sometimes you really have to scrape it.
5. DO NOT RINSE!

Green Chile Sauce

1. Put a medium saucepan of water on to boil and remove the papery outer skin from the tomatillos. Boil the tomatillos until soft, 5 to 10 minutes. You can also grill the tomatillos until soft.
2. Drain and puree in a blender or food processor.
3. Return the tomatillos to the saucepan along with the chicken broth, chopped green chiles, minced onion, oregano, garlic, salt and pepper.
4. Bring to a boil over medium-high heat and then reduce the heat and simmer for 10 minutes.
5. Add the cornstarch/water mixture and stir well. Simmer, stirring occasionally, until the sauce is thickened and reduced to 4-5 cups, another 10-15 minutes.
6. Adjust seasonings and add hot sauce if you want a little more heat.

Stacked Green Chile and Grilled Chicken Enchiladas

1. Heat a gas grill to medium high or build a medium-hot charcoal Coat the chicken with olive oil and season well with salt and pepper. Preheat oven to 450 degrees.
2. Grill the chicken until just cooked through, 4-5 minutes a side for boneless chicken breasts.
3. Cool and then slice into thin strips or shred.
4. In a small skillet, heat 3 tablespoons oil over medium-high heat until very hot. Dip the edge of a tortilla into the oil to check – it should sizzle immediately.
5. Using tongs, put a tortilla into the pan and cook until soft and lightly brown on each side, about 15-20 seconds per side (at the most).
6. Drain on paper towels.
7. Add oil as needed and continue until all 12 tortillas are done.
8. In a baking dish large enough to hold four separate stacks of tortillas, ladle a thin layer of sauce.
9. Lay four tortillas in the dish and ladle another ½ cup (4 ounces/112 grams) of sauce over the tortillas.
10. Divide half the chicken among the first layer of tortillas, top with another ½ cup of sauce and 1/3 of the grated cheese.
11. Stack another four tortillas, top with the rest of the chicken, more sauce and another third of the cheese.
12. Finish with the third tortilla, topped with the remaining sauce and cheese.
13. Bake until the sauce has thickened and the cheese melted, about 20 minutes. Let rest for 5-10 minutes.
14. To serve, transfer each stack to a plate. Spoon any leftover sauce over the stacks and sprinkle with cilantro, if you wish. The stacks may also be cooked in individual gratin dishes.

Honey Garlic Chicken

In Chicken on February 19, 2010 at 4:49 pm

Gorgeous? Yes. Delicious? Heck yeah.

First of all, I must apologize for not posting yesterday. I was just beginning to write when WordPress crashed. Nice, huh?

Anyway, on to the chow!

I bought yet another value pack of chicken leg quarters – I know, I know, but I love $1.50 / pound! So, because I’m a cheapskate (I prefer thrifty), I need to come up with all these interesting ways to make bone-in chicken. I prefer it to be sticky, and preferably roasted or baked – I never trust myself to cook bone-in chicken on the stove top. I never have luck with it. Either overdone or underdone, never Goldilocks perfect.

I thought of Honey-Garlic Chicken, because I love Chinese food (I could eat it ’til I pop), and once I smell it or even think about it, I’m not happy until I eat it. Problem is, I would have to debone the chicken. Now, leg quarters look awfully impressive when left whole, but there’s not a whole heck of a lot of meat on them. If I took the meat off the bone, I would have about a handful of pitiful-looking dark meat to make my stir-fry with. So, I decided to experiment a bit to see if I could come up with a roasted Honey Garlic recipe. Did I? Ooooh yes.

It was beautiful! Simple, easy, sticky, sweet, tangy! And the dipping sauce was sublime – I had to stop Mr. Gorilla from drinking it. Just plain delish.

Honey-Garlic Chicken

Ingredients:

2 chicken leg quarters

1/4 cup ketchup

1/2 cup honey

1/4 cup red wine vinegar

1/4 cup soy sauce

1/2 cup packed brown sugar

4 cloves garlic, pressed

1 rounded teaspoon ginger

Directions:

Combine all ingredients in a Ziploc bag, seal, and give it a good shake to mix. It’s best to mush it around with your fingers a little to make sure the honey and ketchup get combined right.

Add the chicken, and marinate for at least an hour.

After marination (I don’t think that’s a word), place the chicken on the rack of a roasting pan and roast uncovered at 350 for about 45 minutes or until juices run clear.

Just one more thing to do, and you can go one of two ways with this: you can pour the marinade into a small saucepan, or if raw chicken freaks you out, you can mix up another batch of the marinade. Either way, pour it into a small saucepan and bring it to a boil. After one minute of boiling, let it simmer for a few minutes ( about 5).

Use this mixture to baste the chicken 3-4 times before it’s done. Whatever’s left can be served as a dipping sauce.

Now, don’t expect this to taste like Chinese take-out – it’s a totally different creature. But it’s a beautiful creature in its own right! And you know what? I totally made it up! Yup, right off the top of my head. And it worked! I love it when that happens!

Hummus-Stuffed Chicken

In Chicken on February 12, 2010 at 6:40 pm

Awful picture. Great chicken!

I made this awhile ago, and I just haven’t posted it yet because the pictures are awful. It’s really not a pretty dish, and it would take food styling skills I do not possess to make it attractive. It is, however, awesome to eat. It started as one of those things you throw together to use up some leftover odds and ends, and grew into this brilliant dinner. It’s a beautiful combination of flavors, and a nice change of pace.

It’s a pain to put together, I know. Just don’t be afraid to get messy, and everything will be okay, I promise. Besides, taste is more important than looks, right? Right. This ain’t a restaurant.

Hummus-Stuffed Chicken

Ingredients:

3 chicken thighs, deboned

1 1/2 cups fresh spinach

1 cup hummus

1 cup tzatziki

salt, pepper, turmeric, coriander, cinnamon

Directions:

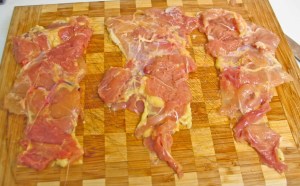
Raw chicken is so gross!

Debone the chicken if you haven’t already. This was the first time I had attempted this, and I realized I totally suck at deboning. If you do too, just try to muddle through. Just get the bones out – looks aren’t important here.

Next, pound the chicken as flat as you can without totally destroying it. Again, it doesn’t have to be perfect.

Okay, now it's getting better...

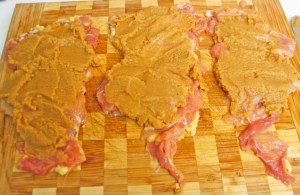
Divide the hummus evenly between the thighs. The chicken’s, not yours. That would be weird. Leave the very bottom inch or so bare – it will help when it comes time to roll them. Roll them? Yes, roll them. We are.

*Note – My hummus is a weird color because I made it with apple butter. Feel free to use your favorite kind of hummus.

Well, now it's getting downright pretty!

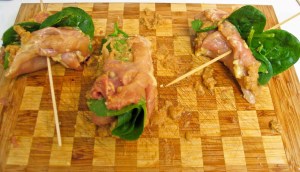
Divide the spinach evenly between the CHICKEN thighs. Try to lay it on in some kind of order – this will also help when we roll them. Don’t get too crazy.

Okay, interesting. It's been impaled. Hm.

Now roll each thigh as tightly as possible, leaving the bare end on the outside. Only if the planets are aligned in your favor will they actually stay rolled – secure them with skewers if need be. Toothpicks are generally too short, and only add to the melee. One of mine actually stayed rolled at first, only to require skewering while in the pan.

Sorta pretty, I guess. But it's looking delicious!

Coat with spices – I mean COAT IT! Don’t be shy. Combine the seasonings in whatever ratio suits your fancy, but put a lot of it on there!

Cook in a large skillet over medium heat until the chicken is done. Do the feel test. Once it’s done, you may remove the skewers. Also, clean up the mess you made with the hummus and seasonings.

Oh, how ugly. But how delicious!

Top with tzatziki and serve with couscous and marinated cucumbers. Delish!

Look, I know it’s not pretty. This type of thing does not lend itself to photography. No bright colors, everything’s all beige and bland-looking. But if you did your job with the spices, I can promise you it won’t taste that way!

Balsamic Roasted Chicken

In Chicken on February 10, 2010 at 5:05 pm

Omigod. I know.

Roasted chicken is great because it is one of the most variable dishes you can make. Seriously, no matter what you have on hand (as long as you also have a chicken), you can make a delicious meal out of it. That, and the fact that raw, naked chickens are very good dancers is why I make them so often. I love experiments! Most of the time they turn out great – the other times, I’d rather not talk about.

This, however, was one of the happy times. The meat was moist and delicious, and the skin was fantastic. You know, lately I’ve been getting into the habit of eating the chicken skin. This is not good. I don’t need extra fat and calories. At all. In fact, I need a good deal less. But what’s the point of all these beautiful rubs and bastes if you don’t eat the skin? At least a nibble.

As an aside – I know I need to diet, really I do. I like to be thin just as much as anyone else. But you know what? It’s not worth making yourself miserable over. As long as you’re healthy, that’s all that matters. I can do push-ups (NOT the girly-kind) and pull-ups, run for an hour (7.0mph, thankyouverymuch) without passing out, and bellydance for hours. Who cares if my thighs jiggle? So I’m not a size zero. Oh well, I’m happy. And besides – my beauty ideal is closer to Marilyn and Lucy than Lindsay and Paris. So there. I’m beautiful, AND I can eat. Envy me.

Okay, just had to get that off my chest. Back to the chicken. It was great! And since there’s only two of us, it makes multiple dinners. Tonight, we ate the limbs (with Marsala potatoes and salad), and in a couple of nights we’ll eat the breasts in a chicken caesar salad with homemade dressing – keep an eye out; I’ll be posting the recipe soon.

Balsamic Roasted Chicken

Ingredients:

For the rub:

3 cloves garlic, pressed

1 tablespoon dried parsley

1 teaspoon dried oregano

1 teaspoon dried basil

several dashes salt and pepper

1/2 teaspoon balsamic vinegar

about 2 tablespoons olive oil

For the baste:

1 1/2 balsamic vinegar

1 teaspoon soy sauce

1/2 cup brown sugar

1 tablespoon dried rosemary

1 large chicken

2 tablespoons butter

sprinkle of rosemary

Directions:

Rinse your chicken and pat it dry. Play with it awhile if you want – it’s fun to put it in different funny situations around the house – but clean up with Lysol afterwards. You don’t want chicken germs everywhere. Resist the urge to wrap it in a blanket and carry it around the block to see people’s reactions. It’s uncouth.

The rub should be dry and crumbly, but it should kind of stick together.

Make the rub: Combine the garlic, parsley, oregano, basil, salt, pepper, and vinegar, and stir. Drip in the olive oil, stirring as you go. Stop dripping the oil when the mixture reaches a sort of pasty consistency. You want it to just hold together.

See? The rub goes UNDER the skin.

Now here’s the gross part. Run your hand underneath the skin of the chicken, separating it from the breast, but keeping it on the chicken. I know, I know, but you’re almost done. Create a pocket over the entire breast area of the chicken, and using your hands, smooth the rub all in there. Try to keep it as even as possible, but it won’t be perfect. Now you may remove your hands from the chicken. You’re welcome.

Brush the surface of the chicken with about 2 tablespoons melted butter, and sprinkle with rosemary.

Roast uncovered in a 350 oven until done (about 20 minutes per pound).

While the chicken is starting to roast, make the baste: Over medium heat in a small saucepan, combine the balsamic vinegar, soy sauce, brown sugar, and rosemary. Simmer until reduced by half. Using a brush, baste the chicken with this fragrant concoction every 15-20 minutes or so, until done.

Look how pretty! Good enough to eat!

When the juices run clear and the leg moves easily in the socket, your bird is done! Let it rest for a few minutes before carving. Then try not to eat the whole thing yourself. Just try.